

YEASEN은 생명과학 연구 및 진단을 위한 고품질의 연구용 시약과 기기를 제공하는 글로벌 바이오 기업입니다.
제품 설명
16-Channel Automated Nucleic Acid Extraction Instrument
제품 번호
80512ES01
제품 설명
Product description
80512ES01 1 set AP-16S is an integrated nucleic acid automatic preparation system designed to purify nucleic acids from various biological samples including whole blood, viruses, tissues, plants, bacteria, and cultured cells. With intelligent pre installed extraction programs, matched magnetic bead-based nucleic acid extraction kits and consumables, the system can process 1-16 samples simultaneously, providing laboratories with efficient, automated, and high quality nucleic acid purification solutions for downstream gene analysis and molecular diagnostics. It is mainly used for the extraction and purification of nucleic acids from clinical samples. The fully automatic nucleic acid extraction instrument consists of mechanical and electrical components: housing, upper cover,samplemixing mechanism,magneticbeadtransfermechanism,heating module,HEPAfilter(optional), UV sterilization unit, color touch screen, fully automatic nucleic acid extraction software, and human-machine interaction control software.
Product features
Compact design: Simple and compact appearance, portable, saving laboratory space. Sample protection: Power-on self-check, silent operation, high-temperature alarm, and over-temperature protection functions to minimize sample loss. Diversified reagent solutions: Based on the Yeasen nucleic acid extraction and purification platform, with preset reagent programs for convenient and practical use. Contamination control: The experimental chamber is equipped with a negative pressure HEPA exhaust filtration module and a built-in UV disinfection module to prevent sample contamination. Reminder function: Equipped with magnetic sleeve installation reminder to avoid contamination of the magnetic rod sleeve affecting the instrument lifespan. Intelligent operating system: On-board touch screen with simple interface, freely switchable between Chinese and English systems.
Working principle
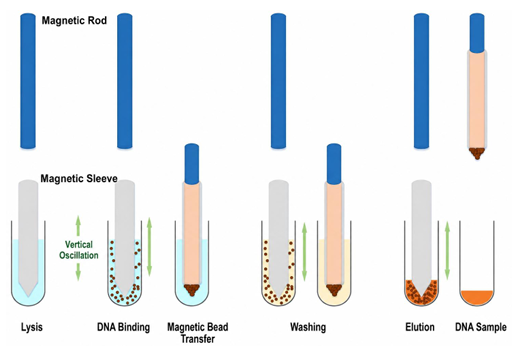
Figure 1. Schematic diagram of the working principle of the fully automatic nucleic acid extraction instrument
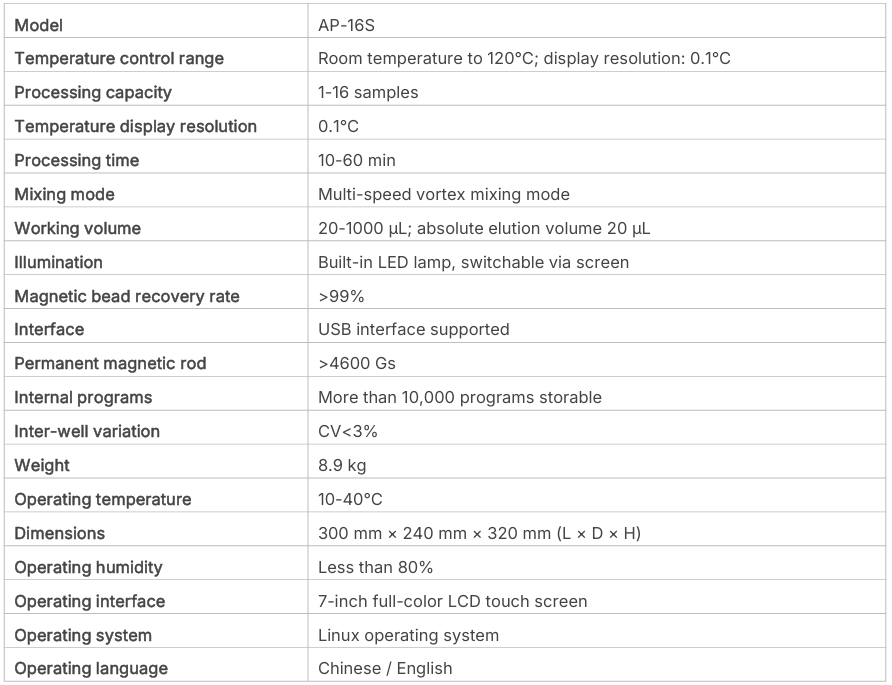
Technicalparameters
Operationguide
1.Pre-operationNotes Storageenvironmenttemperature:-20℃to50℃. Storageenvironmenthumidity:20%-80%.
2. InstallationEnvironmentRequirements TheAP-16Sfullyautomaticnucleicacidextractioninstrumentmustbeinstalledandusedindoorsthatmeet the followingenvironmentalconditions: ①Ambienttemperature:10℃to40℃;
②Relativehumidity:30%to70%;
③Altitude:Below2000m;
④Powersupply:220-240V~/160W,50Hz/60Hz;
⑤Totalweight:8.9kg;
⑥Keepawayfromsourcesofstrongelectromagneticinterference;
⑦Haveagoodgroundingenvironment;
⑧Well-ventilated,avoidingdirectsunlight;
⑨Theinstallationtablemusthaveaspaceofnolessthan40cm×40cm×50cm(L×W×H),beflatandstable, andcapableofbearingmorethan15kg;
⑩ Leave at least 15 cm of space on both sides of the equipment, and at least 20 cm of space at the rear of the equipment; ensure the equipment is not placed in a position that is difficult to operate or disconnect.
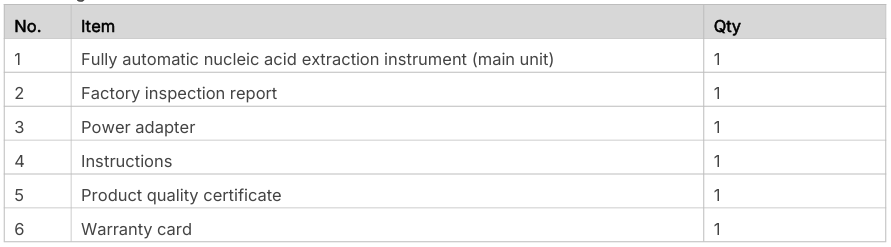
3. Packing List
4. Power Connection
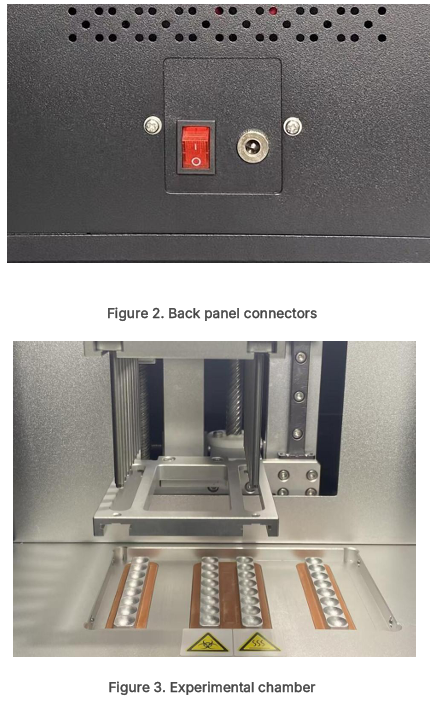
Back panel connectors: power cord connector. 1 Insert one end of the power cord into the device connector, and connect the other end to a properly grounded power outlet to provide the required power. Improper grounding may cause electric shock and system damage. The power button is located on the right side of the instrument. Before turning on the power, please confirm that there are no foreign objects inside the experimental chamber, then press the power button.
5. Power-on Self-check
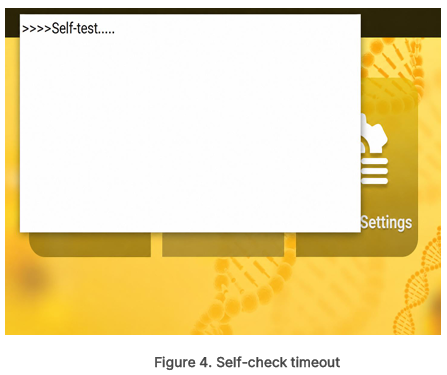
After normal power-on, the instrument will perform a power-on self-check, and will enter the main page if the self check is normal. If the instrument makes abnormal noises, displays error pop-ups, or the self-check takes too long to complete, please power off in time and contact the dealer or manufacturer. Do not disassemble the instrument.
6. Software Operation Instructions
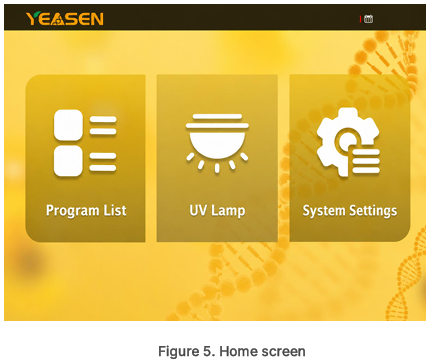
The main page icons are, in order: 〈Program List〉, 〈UV Lamp〉, 〈System Settings〉.
6.1 Starting a Pre-set Extraction Program
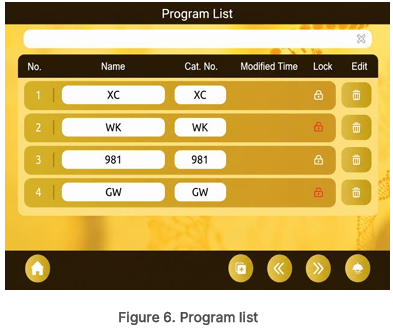
Tap the "Program List" button on the main screen to enter the program list interface. The bottom buttons are, from left to right: Home button, New Program button, Page Left button, Page Right button, and Illumination Lamp.
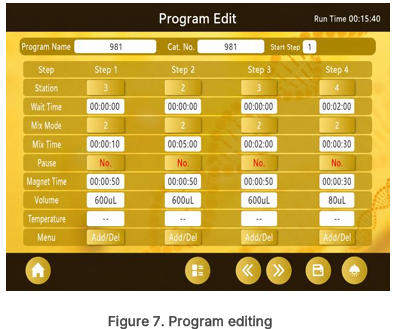
6.2 Program Editing
Tap the "Number-Name-Cat.No." area to enter the program editing interface.
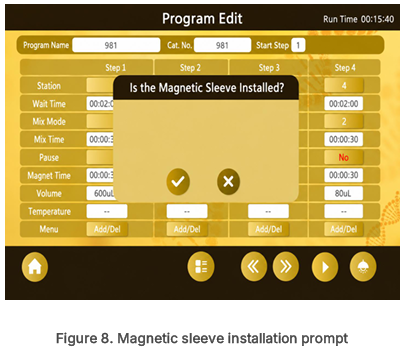
6.3 Magnetic Sleeve
Installation Prompt Tap the "Run" button, and a "Magnetic Sleeve Installation Prompt" will pop up. Please be sure to check whether the magnetic sleeve is installed! If the magnetic sleeve is installed, tap "√", and the instrument will start running. If you exit by mistake, tap "×".
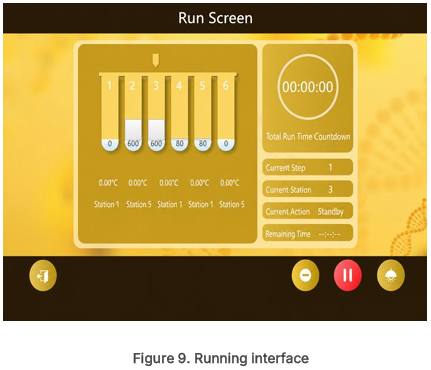
6.4 Running Interface
The running interface will display the total countdown, current action, remaining time of the current action, etc.
The graphic area will indicate the current workstation, the liquid volume in the deep-well plate, and the module temperature. The bottom buttons are, from left to right: Return to Program Editing button, Stop button, Pause/Resume button, and Illumination Lamp. During program operation, the user can tap the "Pause" button to pause the currently running program, or tap the "Stop" button to terminate the current program. Note: After pressing the Pause button, the robotic arm stops moving, but the workstation does not change, and the program can continue to run afterwards. After pressing the Stop button, the program will terminate, and the robotic arm will automatically return to the initial workstation.
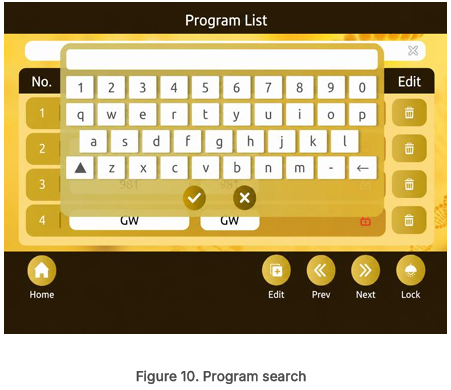
6.5 Program Search Function
If there are many programs in the program list and it is difficult to find a specific one, tap the "Search Area" and a keyboard will pop up. Enter a keyword to retrieve the corresponding name or Cat.No., and you can quickly find the program you need.
6.6 Program Deletion Function
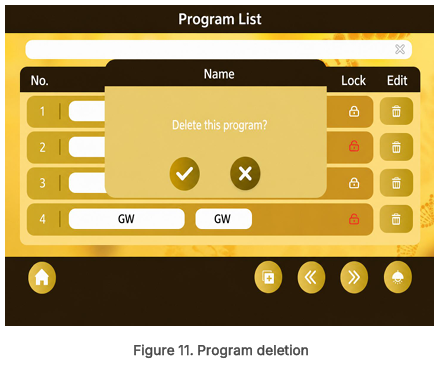
If the "Encryption" area of the program showsaredlockicon,theprogramisencrypted,andapasswordisrequired to delete the program or modify parameters. If the "Encryption" area shows a white lock icon, the program is not encrypted, and you can freely delete the program or modify parameters. Tap the Delete button. For non-encrypted programs, a confirmation pop-up will appear directly. Tap "√" to delete the program, or tap "×" to cancel the deletion.
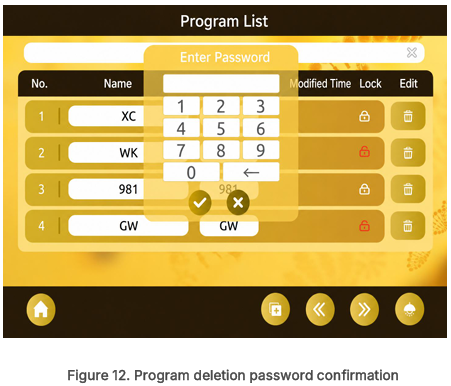
Tap the Delete button. For encrypted programs, a password box will pop up. After entering the correct password, tap "√" to delete the program, or tap "×" to cancel the deletion.
6.7 Power Outage Protection Function
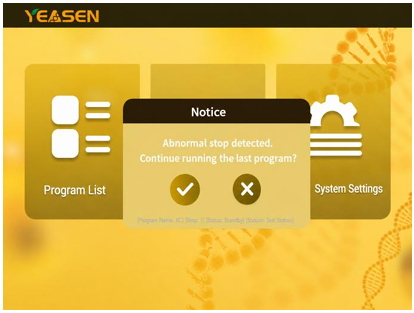
If a power outage occurs during the operation of the instrument, the instrument will memorize the program running state at the time of the power outage. After the power is restored and the instrument is turned on, the user will be prompted whether to continue running the program before the power outage. The user can tap the "√" button to continue the unfinished program. If the user taps the "×" button, the instrument will return to the main page.

6.8 UV LampDisinfection Function
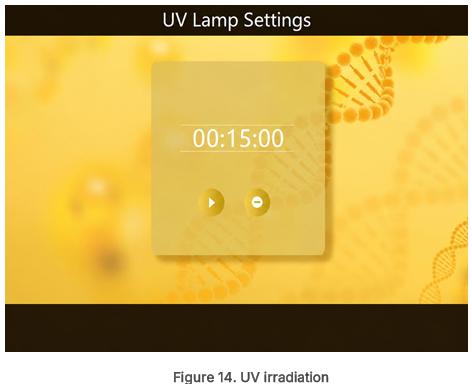
Tap the "UV Lamp" button on the main page to enter the UV lamp setting interface. The UV irradiation time is preset to 15 minutes. Tap the "Run" button to turn on the UV lamp, and tap the "Stop" button to turn off the UV lamp. Tochangetheirradiation time, tap the number and a timekeyboard will pop up."00:00:00" representshours, minutes, and seconds.
Notes
Instrument Maintenance and Operational Safety
1. Please read the instructions carefully before using the instrument.
2. Regularly clean the instrument with 75% ethanol and turn on the UV lamp for more than 30 minutes for disinfection. Avoid contact with strong corrosive liquids and mechanical impact.
3. Ensure the operating environment of the instrument is relatively stable, provide stable voltage, and the operating environment temperature and humidity meet the requirements. The table on which the instrument is placed should be stable.
4. Be sure to install the magnetic sleeve before each operation to avoid direct contact between the magnetic rod and the solution, which may cause contamination of the magnetic rod. If contamination occurs, please carefully wipe it with 75% alcohol or distilled water and a clean cotton cloth.
5. Non-professional after-sales personnel are not allowed to open the instrument to replace components or make internal adjustments without authorization. Such operations must be performed by professional maintenance personnel recognized by our company.
6. Pay attention to electrical safety. It is strictly forbidden to operate with wet hands.
7. During program operation, it is strictly forbidden to touch the heating block with bare hands to avoid burns.
8. After the program ends, a bell will ring. After the bell rings, press the Return button to return to the program settings main page.
9. If the instrument needs to be transported, please fix the stirring sleeve rack first and handle with care.
Troubleshooting
1. Screen has no display
A. Check whether the machine switch is turned on
B. Check whether the power cord is properly plugged in
C. Check whether the power outlet has electricity
D. If the machine still cannot be turned on, please contact after-sales service
2. Themachinecannotcompletetheself-check,orcannotcontinuerunningduringoperation,andmakesabnormal noises
A. Check whether there are foreign objects on the track, preventing the robotic arm from moving
B. Check whether there are foreign objects on the magnetic rod sleeve rack
C. Check whether the magnetic rod sleeve is not inserted in place
D. Check whether the deep-well plate is correctly placed into the workstation
E. If the machine still cannot operate normally, please contact after-sales service
3. Instrument crash
A. Use the power switch on the back of the instrument to restart the instrument
B. If there is still no response after several restarts, please contact after-sales service
4. UV lamp does not light up
A. Restart the instrument, turn it on again, and check whether it is caused by a crash
B. Check whether the UV lamp tube is in good contact
C. Replace with a new lamp tube
5. Magnetic beads in a few wells are not cleanly absorbed
A. Check whether there is dirt or damage
B. Use a magnet to check whether the magnetic rod has lost its magnetism
6. Heating block does not heat
A. Check whether the heating temperature and time are set correctly
B. Restart the instrument and check whether it is caused by a crash C. If there is still no response, it should be a hardware problem. Please contact after-sales service
7. If liquid enters the instrument or the instrument suffers a major mechanical impact, the power should be cut off immediately and after-sales service should be contacted as soon as possible.
YEASEN의 모든 제품을 만나 보세요!
YEASEN - Official Distributor in South Korea "Morebio" 한국 공식 대리점 "모아바이오"


 MSDS
MSDS 온라인 견적


